Vocabulary development is an important part of teaching English to beginners. Students not only need to learn new words, but they also need multiple opportunities to interact with the new vocabulary in order to recall and use the words independently.
This week’s Teacher’s Corner will focus on creating a vocabulary chart that can be used to teach new words as well as to review them with beginner-level students. It is suggested that the chart be completed over one or two class sessions, depending on how many words you include and the length of your class sessions. Each of the review activities can be used as a warm-up in a subsequent class. The review activities can also be repeated to provide students with multiple chances to practice the new words.
Creating a vocabulary chart
Time: 20-30 minutes to discuss and add new vocabulary to the chart
Goals: To help students learn new vocabulary words and definitions. To create a vocabulary tool to practice new words multiple times.
Materials: One chart for each student (photocopied or copied into student notebooks); pencils; a list of words and definitions; visuals or examples for words (such as photos, objects, diagrams, videos, illustrations, or actions), if available.
Preparation: Choose 5-10 vocabulary words you would like to teach students. The words can be related to a topic you are about to teach, or can come from a text that students will read. It is recommended that you introduce the vocabulary words and complete the chart with students before they encounter the vocabulary in a lesson or text. Prepare definitions for each of the words, being careful to write the definitions in a way that beginners will understand.
Procedure:
- Begin by providing students with copies of the chart, or by writing it on the board for students to copy into their notebooks.
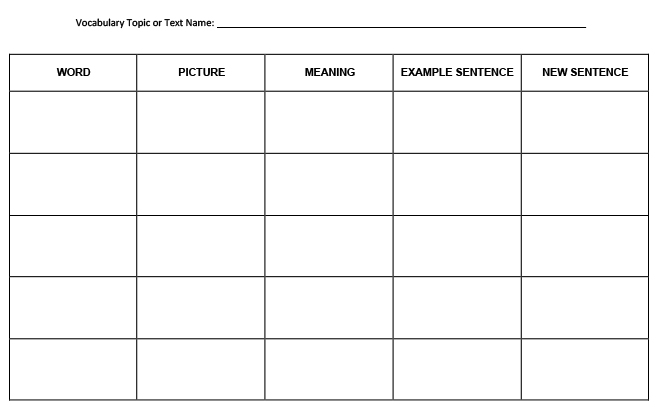
- Explain to students that the chart will be used to write down information for vocabulary they will encounter in an upcoming lesson or text. You can write the topic or the title of the text at the top of the chart to help students connect the vocabulary to the lesson or text. For beginner students, it is recommended that you write everything on the board as students are expected to write it in the chart.
- Start by writing the first vocabulary word in the WORD column and by saying the word clearly. Have students repeat the word several times. If desired, you can also note the part of speech.
- Next, tell students what the word means, preferably by using a simple definition. Write the student-friendly definition in the MEANING column of the chart.
- It is also helpful for beginners to have a visual to explain the word or concept (see “Materials,” above, for examples). If an object, photo, or illustration is available to show students, use it to help explain the definition of the word. For very low-level beginners, you can replicate the visual as a simple sketch in the PICTURE column of the chart. For beginners with a bit more experience or language ability, you may ask them to create their own quick sketch or visual, either at this point in the class or at a later time as part of a reinforcement activity.
- If your students are very low-level beginners, provide a simple sentence using the new vocabulary word. Write the sentence in the EXAMPLE SENTENCE column of the chart. If your students are more proficient, you can ask them to think of example sentences and then choose one to include in the chart. (The NEW SENTENCE column of the chart should be left blank at this point.)
Review activities using the vocabulary chart
Time: 5-10 minutes for each practice activity
Goals: To provide students with multiple opportunities to review and interact with new vocabulary words and their meanings.
Note: Each of these activities should be thoroughly explained and modeled the first few times students try them. Eventually, students will remember the procedures for each one and should be able to complete the activities on their own.
Activity one: Partner Quiz
Materials: Students’ individual vocabulary charts
Procedure:
- Assign partners, or allow students to choose partners.
- Explain that the two partners will quiz each other using the vocabulary charts they created. One student will read the meaning of a word from the chart and the other student will try to identify the vocabulary word being defined. For this part of the activity, the student who is trying to guess the words should cover all the columns on his or her chart except the WORD column.
- For students who are very low-level beginners, this activity can also be teacher-led. You can provide a definition and students can work in their pairs, using their charts, to identify the associated vocabulary word.
- Partners should switch roles after one student has finished quizzing the other.
Activity Two: fill in the missing word
Materials: Example sentences used in the vocabulary chart, pencils, vocabulary words listed on the board
Procedure:
- Tell students that they must put away their vocabulary charts for this review activity. List all of the vocabulary words on the board. Have students write the numbers 1-10 (depending on the number of words) on a paper or on a page in their notebooks.
- Explain that you are going to write sentences (from the EXAMPLE SENTENCE column) that are missing one of the vocabulary words on the board. Students must determine which word belongs in the blank for each sentence and then write the word (or sentence) next to the number on their paper.
- This activity can be completed individually, in pairs, or in small groups. Additionally, a worksheet of sentences with blanks for the missing words and a word bank can be prepared ahead of time and given to students rather than writing on the board.
- As a further modification for very low beginners, provide only one sentence at a time. Rather than using the whole list of words as a word bank, give students 1-3 options to choose from for each sentence.
Activity three: vocabulary mix and match
Materials: Index cards or pieces of paper cut into approximately 3-inch x 3-inch squares (you will need four cards per vocabulary word), pencils, vocabulary charts
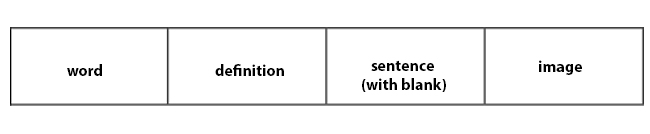
Note: This activity will use four cards per word, one card for each of the following: the word itself, the meaning, a sentence with the word missing, and an image (such as a sketch, a photo, an illustration). See the example below. The cards will be mixed up and randomly distributed to students, who will have to mingle and match all four cards to form a complete group or set. Consider the size of your class and how many words your students are learning in order to determine how many cards you should make. If needed, you can repeat words by making extra sets, or combine the word and image onto a single card (so that students will only match three cards total), etc.
Procedure:
- Cards for the activity can be prepared ahead of time, or you can have students make them in class using their vocabulary charts. If you decide to have students create the cards, assign one word to a group of four students. Explain that they should make one card for each of the components above using the exact information from their vocabulary chart. Have students put away their vocabulary charts when they finish creating the cards.
- Gather all of the cards and mix them up well.
- Tell students that the goal of the activity is to form a set of four correct cards (word, definition, sentence, and image) for each word.
- Before you distribute the cards, tell students you will place a card on their desk face down and that they shouldn’t turn it over until you give the signal to begin. Pass out one card to every student.
- Give a signal (such as clapping, blowing a whistle, or starting music) and allow students ample time to mingle and find their matches. You should also move around the room to assist any students who may need help or have questions.
- When students have all found their matches, each group can share what is on their cards and the rest of the class can check for accuracy. If there are any mismatches, the student(s) with the mismatched card(s) can step aside until the group with the correct matching set comes up and shares their word.
- If desired, once students become more comfortable with this activity, you can make the game competitive by offering an incentive or prize for the group who correctly assembles their set of cards first.
Activity four: Partner/small group sentence writing
Materials: Students’ individual vocabulary charts, paper or notebooks, pencils or pens
Note: This activity should be completed after students have already had a chance to interact with the vocabulary words in multiple ways through the other activities. If you have very low-level students, or if you have ten words in your chart, you can split this activity over two class meetings, and use a third meeting for students to share.
Procedure:
- Have students take out their vocabulary charts. Review the sentences in the EXAMPLE SENTENCE column. Explain that during this activity students will work together to write a new sentence for each of the vocabulary words.
- Assign each student one or two partners to work with (or allow students to choose partners)
- Students and their partners should complete the NEW SENTENCE column of the vocabulary chart. If needed, the sentence can be similar to the example sentence already on the chart, or you can provide a model sentence starter for each of the words on the board.
- When students finish writing new sentences, have them find new partners and share the new sentences they have written for each of the words.
Creating and using this vocabulary chart multiple times during a unit of study can help beginners retain vocabulary. The practice activities also allow learners to interact with the words in familiar ways, which increases their ability to use the words independently.