Displaying 731 - 740 of 1647

One of the most pressing issues in our world is global warming, or climate change.  Is it happening?  How fast?  And what can we do?  Our presenters believe the first step toward solving a problem is knowing that there is a problem. This webinar will review key themes related to climate change and the environment and will provide relevant, thought-provoking activities and materials that teachers can easily use in their English language classes.

Authors: Kevin McCaughey, Eve Smith Format: Text, Video

One of the greatest joys for teachers is to be able to inspire a love of teaching in their own students. Having students tutor other students is one way to accomplish this. A well-planned and carefully organized tutoring program can lead to remarkable gains for tutors, tutees, and teachers.

While starting a tutoring program may seem like a daunting and time-consuming task, it does not have to be. The best way to approach the creation and development of a tutoring service is with a list of clear objectives. In this article, I describe the process I used to create a tutoring program with my English as a foreign language university students. I identify questions that need to be addressed at each step of the program development process, then explain how my student tutors and I answered these questions.

The answers that shaped the final program were specific to our situation and location; however, if I had been in another location with different students and resources, the same questions would have led to different answers—and a different program. But it would have been a program tailor-made to fit the needs of the student tutors and the tutees. Thus, the only “right” answers to these questions are the ones that are “right” for each teacher’s time, place, and students.

What is tutoring?

It is perhaps best to begin by looking at an explanation of what tutoring is and what benefits it provides to both the tutors and their tutees. Peer tutoring, also known as peer-assisted learning, is defined as “the acquisition of knowledge and skill through active helping and supporting among status equals or matched companions” (Topping and Ehly 1998, 1). It can incorporate everything from teaching, mentoring, and counseling to behavior modeling. Much of the research on peer tutoring is overwhelmingly positive (National Tutoring Association 2002). Peer tutoring has been studied in multiple settings and with many types, ages, and levels of learners, including (but not limited to) children, teenagers, second-language learners, and autistic learners. It has been studied with a variety of subjects, from biology and mathematics to physical education.

The positive benefits are numerous and significant. Topping and Ehly (1998) note that “tutors can learn to be nurturing toward their tutees, and in so doing, develop a sense of pride and responsibility” (4) and that improved motivation and attitude can lead to “greater commitment, improved self-esteem, self-confidence, and greater empathy with others” (13–14).

But tutoring leads to gains in more than self-esteem and empathy, important as these are. Research indicates that students who tutor others also make significant academic gains (National Tutoring Association 2002; Topping and Ehly 1998; Galbraith and Winterbottom 2011; Fantuzzo et al. 1989; National Education Association 2014). In their study of peer tutoring, Galbraith and Winterbottom (2011) report that “tutors’ perceptions of their role motivated them to learn the material, and their learning was supported by discussion and explanation, revisiting fundamentals, making links between conceptual areas, testing and clarifying their understanding, and reorganizing and building ideas, rehearsing them, and working through them repeatedly, to secure their understanding” and that “mental rehearsal of peer-tutoring episodes helped them appreciate weaknesses in their own subject knowledge” (321).

It is important to be aware that, while this article focuses on a program that was created to provide teaching experience to pre-service English teachers, anyone can tutor—and anyone can be tutored. Tutors can be almost any age, from primary school up, and they can come from a variety of different disciplines and specializations. Ten-year-olds can tutor six-year-olds. Biology students can tutor others in biology. Accountants can tutor in business. The benefits to tutors and tutees are similar regardless of the field in which they are working.

How to develop a tutoring program

The following seven steps serve as a guide to plan, develop, and initiate a successful tutoring program.

Step 1: Determine the needs of both the tutees and tutors and design a program that meets them

My first questions were about the tutees, the people my students would tutor. I needed to determine the following:

  • Who (and how old) will the tutees be?
  • Do they need homework help, conversation practice, assistance in writing, or listening practice?

At this stage in the process, it is essential to be aware of local beliefs about education. For example, although peer-tutoring programs are common in the United States, in the culture where I was teaching, university students are reluctant to accept instruction from their peers. Thus, it was best for my students to work with younger, school-aged children who were learning English, and the program became a cross-age tutoring program focused on having tutors use communicative language teaching methodology to provide homework assistance.

Secondly, I had to think about who the tutors would be and what their own needs and goals were. I had to consider:

  • What experience do the tutors need?
  • Do they need opportunities to work with children, teenagers, adults—or learners of all ages?
  • Do they need opportunities to lead classes or groups, or can they focus on one-on-one tutoring?

In my students’ cross-age tutoring program, they would be teaching children with a rather basic level of English. Would this be enough to push their own development of English? Kunsch, Jitendra, and Sood (2007) note that cross-age tutoring, where students have different levels of expertise, is a successful approach. In addition, research on cross-age tutoring indicates that tutors working with younger learners experience gains similar to those of peer tutors in the areas of empathy, confidence, and self-esteem (Yogev and Ronen 1982; Hill and Grieve 2011). Tutors still need to understand English well enough to explain it clearly to younger learners, even if they are using the students’ first language. In fact, clarity of explanation would be vital, as children have fewer metacognitive or coping strategies to resort to if they do not understand something.

My next question was, “Who should tutor?” I did not want to make being a tutor mandatory for all my students. I also wanted the service to be free for the children, meaning that the tutoring would not generate any income and that I would not pay my tutors for their work.

I also asked myself what criteria I should set for selecting my tutors. Should I allow only my students with the highest levels of English to tutor? What role should a student’s responsibility, motivation, and initiative play in my decision regarding who should tutor? In the end, I opened the program to all my students and presented it as a unique volunteer opportunity that would look impressive on a curriculum vitae (CV). I also talked to students about the benefits of tutoring—how it would not only give them teaching practice, but also help them improve their English.

It is important to remember that tutors do not need to be experts in what they are tutoring; they can be in the process of learning the material. After my tutors had been tutoring for several months, I asked them what qualities a tutor should have. They responded that tutors should be interested in helping people, open to learning about their tutees and trying different techniques and ways to connect with them, and able to explain difficult concepts in simple, easy-to-understand language. Even the tutors themselves recognized that it is not necessary for an effective tutor to have advanced English proficiency.

Step 2: Consider what resources are available

Try to answer the “who,” “what,” “where,” and “when” questions about available resources to identify what you have and do not have. Some things to consider include:

  • Who is available to observe and assist the tutors and provide feedback?
  • What books and materials are available for the tutors to use?
  • What other resources (e.g., computers, whiteboards, markers, desks, classrooms, Internet access) are available?
  • Where can the tutoring sessions be held?
  • When is the best time to hold the tutoring service?

For a new program, the ideal situation is one where the program can build on the popularity of a similar service. In our case, the local American Center was already offering English conversation classes to school-age children on Saturday afternoons, so it made perfect sense to arrange our tutoring service to coincide with their classes so that children could come early, receive homework help, and then stay for their conversation class. The American Center staff found a room to use for the tutoring and also made announcements to the children in their conversation classes.

Of course, not all teachers are as lucky as I happened to be—but, as my tutors became fond of telling people, all you really need for a successful tutoring session are a tutee, a pencil, and some paper. Tutoring can happen in any space and at any time. The most important aspect is the interaction between tutor and tutee, and that can happen anywhere.

One extremely important resource is other teachers who might be interested in helping develop and run a tutoring program and providing support to tutors. In fact, a group of teachers can divide the various tasks of recruiting tutors, training tutors, and advertising the program. But even if there are no other teachers who are available to help set up and run a program, as the tutors become more experienced, they will be able to take on more and more responsibilities. In fact, this model worked well for us because it helped the tutors become self-sufficient and built their confidence and self-esteem.

Also, as the tutors became more experienced, they were able to develop their own materials. After a few months, there was a cabinet full of teaching aids that the tutors had collected or created on their own initiative.

Step 3: Develop a training program that is tailored to the context

Again, look at who the tutors are, who the tutees will be, and the type of tutoring program you are planning. Different situations will require different information in training sessions to reflect the needs of the tutors. Skills-focused tutoring (such as writing, speaking, reading, or listening tutoring) will require different training than tutoring focused on providing homework help. Training can include information on any of the following areas, among others:

  • methods of language teaching
  • classroom management and behavior management
  • child psychology and development
  • error correction
  • learning preferences and communication styles

Although creating a training packet can be a time-consuming task, it needs to be done only once, and teachers developing a training packet can ask other teachers for their input and assistance. In developing a tutor-training program, teachers can mine numerous resources available on the Internet and in teaching methodology books as they search for training materials. The Internet resources listed in the Appendix can help. Some of the resources listed (for example, the Anoka-Ramsey Community College Tutor Training link) are complete tutor-training modules including readings and assignments. Teachers who have limited time to create a tutor-training program from scratch can have their tutors complete the training modules from this site or others. Again, the approach depends on the needs of the teachers, tutors, and tutees, and on the resources available. Personal teaching experience can also be part of the training materials; in fact, it might be the most valuable of all resources. An experienced tutor can be treated as a resource and should be encouraged to share tips and techniques with new tutors.

The training packet that I created contained lessons on effective tutoring techniques, communication skills (including active listening), and ways to correct errors. Because finding time for training sessions was difficult, tutors were required to complete the training packets outside the training sessions by working with a partner. Each training session consisted of a review of the work the tutors had done, and the last ten minutes were used to set up the next tasks and answer questions about them. The system worked, especially when the tutors realized that if they did not complete the tasks, they would not be allowed to work as tutors.

The most important parts of any tutor-training program include practice tutoring, observations, and tutor self-reflection. Teachers should provide new tutors with the opportunity to practice tutoring, preferably with more-experienced tutors; teachers should also observe new tutors at least once and invite tutors to reflect on what went well (and what they could improve) in their tutoring sessions.

Step 4: Recruit and train tutors

This step goes back to the question of who the tutors will be. It is not always necessary that tutors be pedagogy students; remember, they will be provided with the necessary training for successful tutoring. In terms of the hiring process, questions to consider include the following:

  • Should prospective tutors submit CVs and/or undergo interviews?
  • What are the specific hiring criteria?
  • What level of English do the tutors need to have?
  • What other criteria will there be in terms of responsibility, maturity, and communication skills?

I wanted to make the tutoring service as professional as possible and to emphasize the importance of making a commitment. Thus, I required that students submit a CV if they were interested in being tutors. How to write a CV was something we had studied in class, and therefore asking potential tutors to submit CVs was a practical extension of that lesson. I also asked them to write a letter of motivation explaining why they wanted to be tutors. When selecting tutors, I focused on students’ level of interest in tutoring, interpersonal skills, and awareness of what tutoring is and what would be expected of them. Of course, while I considered these qualities to be important for the program I was starting, each program will be different, and thus the criteria for tutors should be different. Ultimately, the criteria for tutors will depend on the program objectives. Motivation, however, is an important quality for program success and sustainability.

Step 5: Advertise the tutoring program

After the tutors have been recruited and trained, it is time to advertise the tutoring program. Work with the tutors to spread the word about the program. Tutors can develop flyers and promotional materials. They can also contact local schools and universities, local English teachers, and English teacher associations; post information about the tutoring service on Facebook and other forms of social media; and encourage people to tell their friends and relatives.

Again, here is where it is useful, when possible, to build connections with other services that are already well known. Initial advertising can be conducted through word of mouth, which was what we did. Once the tutors became experienced, they wanted to advertise the program to a wider audience, and they created a trilingual brochure that included a map showing our tutoring location. They distributed the brochure to parents, English teachers, and children.

Of course, in advertising a free tutoring service for children, there is a danger that demand will outstrip the number of available tutors. When we faced this problem, the tutors took a vote and decided to extend their hours. They also decided to recruit and train additional tutors.

Step 6: Begin the sessions

After recruiting and training, we were ready to start. At this stage, observation, supervision, and feedback are critical to building a strong program. This is worth emphasizing, even if only one teacher is available to provide support to student tutors.

For our first tutoring session, I had the tutors work in pairs, with one tutor doing the actual tutoring and the other observing the session. After the tutoring hour ended, I invited the tutors to share their experiences, observations, and comments and suggestions.

The next tutoring sessions went extremely well. As my tutors worked with the children, I walked around and observed, making notes so that I could offer praise and suggestions. After each tutoring hour, the tutors and I would meet and discuss the sessions as a group. After several sessions, I encouraged the tutors to write a list of rules that would help them deal with the situations that they had encountered. One rule that the tutors felt was important was that parents had to wait outside the tutoring room (otherwise, the parents had a tendency to try to control the tutoring session). Tutors also agreed upon a strict first-come, first-served rule.

Step 7: Expand the program and build self-sustainability

One of the most exciting aspects of a tutoring program is that it provides tutors with opportunities to become leaders and coordinators. A tutoring program will be self-sustainable if tutors take on the responsibility of running and promoting the program, recruiting and hiring new tutors, training new tutors, and continuing to provide feedback to each other. Think about what “officers” are needed to run the tutoring program. Should there be an attendance coordinator? A recruiting and training coordinator? A general coordinator?

Sustainability and growth are important parts of any tutoring program and should be considered even while the program is first being developed. In our situation, I wanted to ensure that the tutors would have the skills and knowledge they would need in order to run the service without me. Also, the majority of my students had never been given any opportunities to lead. I saw in several of my tutors the potential to successfully take on greater responsibility for the program, so I divided the work I was doing for the tutoring service into separate leadership roles and wrote descriptions for each. I decided that the service would need the following: an attendance coordinator to track both tutor and schoolchild attendance; a secretary to take notes at meetings, send out email notifications, and keep track of our resources; a community liaison to promote the service, write grants, and build relationships with local teacher groups; and two hiring and training coordinators.

When the tutors returned from winter break, we held elections to select their new leaders. I immediately gave a stack of new CVs to the hiring coordinators, and we discussed criteria for hiring new tutors. The experienced tutors took charge of hiring, training, and mentoring. The tutors expressed doubts about their readiness to completely take over the service, but as it turned out, they were more than capable of doing so. Six months after I left (and a full year after the tutoring service had begun), the tutors had 70 tutor applications, from which they hired 17 new tutors. As Aydan, one of the leaders of the program, wrote, “Among the new tutors we have diplomats, translators, students from international relations, and others. They have so much desire to work, to help. I hope that this desire will stay with them for a long time.”

What we learned

As a teacher, I learned that a tutoring program leads to previously undreamed-of opportunities for both teachers and tutors. For example, the tutors I worked with were invited to give a presentation at a conference of English teachers in a neighboring country. This conference was, for many of the tutors, the highlight of their tutoring experience. Several of them had never been out of their country before, and none had ever delivered a presentation outside their classes. And yet there they were, standing in front of more than 100 English teachers, talking about the work they had been doing as English tutors.

Although this exact opportunity might not be available to everyone, there will be others. One way to motivate tutors is to connect them to local English teachers’ associations. Perhaps tutors can volunteer at local conferences in exchange for the chance to attend the conferences for free. Tutors can organize classes, festivals, or field trips for their tutees—the possibilities are endless. The main thing is to search for and be open to new ideas and possibilities.

I recently asked my tutors what they had learned from their tutoring experience. While I had expected a positive response, I was taken aback by how much self-awareness and insight their responses showed. Without my having prompted them, several tutors mentioned the same benefits that the researchers cited above had found.

One tutor, Sakina, in responding to my question, said, “Actually tutoring service is not that common in our home country, but implementing this project is really very useful for both the tutors and the students.” Another tutor, Aygul, said, “Tutoring allows you the opportunity to develop intellectually, psychologically, and personally. Tutors mature and gain self-confidence as they work. […] It reinforced my ability to communicate clearly, logically, and creatively.”

Of course, we all learned the importance of remaining flexible, particularly in the early stages of the project. Tutors who were involved from the beginning were able to observe how such a program was designed and developed. Another lesson was the importance of using experienced tutors as resources—not only for hiring and training, but also for the daily operations of the tutoring program and even in the creation of tutoring materials.

For myself, I learned that motivation, particularly intrinsic motivation, is (almost) as good as money—though the tutors certainly looked forward to the baked goods and treats I would bring each week. And while there was one tutor who decided to stop tutoring due to family reasons, the other tutors stayed with the program all year. I attribute this dedication to the fact that they were all highly motivated and found the tutoring experience rewarding and enjoyable.

To help with tutor retention rates, I learned that it was important to provide additional support for tutors with weak language skills. In receiving this support, tutors felt more qualified to teach and at the same time appreciated the opportunity to improve their English. As a tutor named Narmin said, “Tutors and tutees get benefits from this program. We tutors improve ourselves a lot. Sometimes we meet some words which we have forgotten, then we ask one another or look through a book. In this way we learn, too.”

Final thoughts

It is my hope that in detailing the process that I went through, this article can serve as a guide to others who wish to create similar programs. Again, my goal is not that other teachers will create exact replicas of my program; rather, it is that others will use this article and the framework of questions to create their own individualized programs. The questions in Figure 1 can be used as a starting point for discussions with colleagues—and I highly recommend that English teachers work together to divide the work of starting a tutoring program. I have also included a list of online resources in the Appendix that can be consulted in order to create a personalized training manual for tutors in either a peer-tutoring or cross-age tutoring program.


How to Start a Tutoring Program: Questions to Consider

  1. Why am I starting a tutoring program? What do I hope to achieve?
  2. What is the focus of the program (conversation, writing, homework help, etc.)?
  3. Who are the tutors? What are their needs? Strengths? Weaknesses?
  4. Who are the tutees? What are the tutees’ needs?
  5. What resources and materials will the tutors have available to them (books, Internet, computers, paper, etc.)? How and where can the program raise funds (grants, fund-raising, donations, etc.)?
  6. What is the hiring and selection process for the tutors?
  7. Where and when will the tutoring be conducted?
  8. Who will be supervising and providing feedback to the tutors once they begin tutoring?
  9. What should the training program consist of, and how should it be organized? How should the tutors be assessed to determine if they are qualified to tutor?
  10. How will the tutoring program be advertised?
  11. How can the program be made self-sustainable? How can the program be expanded?

Figure 1. A framework of questions to consider when starting a tutoring program

Creating a tutoring program was hard work, and there were many challenges along the way, but the result was more than worth the amount of work that went into the program. The tutors have developed not only a love of teaching but also a greater sense of self-worth. They have come to see themselves as coordinators and leaders. The children who come for help look up to the tutors and often greet them with hugs and big smiles. The tutors take their responsibilities to these children very seriously. They have developed their own techniques for facing challenging situations, some of which reveal amazing insight into teaching and learning. The tutors feel comfortable experimenting with techniques, and they often make their children stand and move, or use colored markers, or sing songs, or watch and respond to short videos.

That the tutors embrace communicative and interactive teaching methodology is especially impressive—and critical—in a society where rote memorization and teacher-centered classrooms are still the norm. Perhaps it is because they are still students themselves that they are able to connect so closely with the children they work with, but whatever the reason, these amazing young tutors all have bright futures as English teachers and as leaders.

References

Fantuzzo, J. W., R. E. Riggio, S. Connelly, and L. A. Dimeff. 1989. Effects of reciprocal peer tutoring on academic achievement and psychological adjustment: A component analysis. Journal of Educational Psychology 81 (2): 173–177.

Galbraith, J., and M. Winterbottom. 2011. Peer-Tutoring: What’s in it for the tutor? Educational Studies 37 (3): 321–332.

Hill, M., and C. Grieve. 2011. The potential to promote social cohesion, self-efficacy and metacognitive activity: A case study of cross-age peer-tutoring. TEACH Journal of Christian Education 5 (2): 50–56.

Kunsch, C., A. Jitendra, and S. Sood. 2007. The effects of peer-mediated instruction in mathematics for students with learning problems: A research synthesis. Learning Disabilities Research and Practice 22 (1): 1–12.

National Education Association.  2014. Research spotlight on peer tutoring: NEA reviews of the research on best practices in education. Washington, DC: National Education Association. www.nea.org/tools/35542.htm

National Tutoring Association. 2002. Peer tutoring factsheet. Lakeland, FL: National Tutoring Association. peers.aristotlecircle.com/uploads/NTA_Peer_Tutoring_Factsheet_020107.pdf

Topping, K., and S. Ehly. 1998. Introduction to peer-assisted learning. In Peer-assisted learning, ed. K. Topping and S. Ehly, 1–23. Mahwah, NJ: Lawrence Erlbaum.

Yogev, A., and R. Ronen. 1982. Cross-age tutoring: Effects on tutors’ attributes. Journal of Educational Research 75 (5): 261–268.

BIODATA:

Deirdre Derrick has worked with English language students and teachers for over ten years. She was an English Language Fellow in Azerbaijan (2012–2013) and is currently working on a PhD in Applied Linguistics with a focus on language assessment.

Appendix:  Online Resources for Creating a Training Packet for Tutors

Peer Tutoring … a proactive intervention for the classroom

www.cehd.umn.edu/ceed/publications/tipsheets/preschoolbehavior/peertutor.pdf

This is a brief, easy-to-read document that answers questions about how to begin and maintain a tutoring program. Although it is geared toward working with students with learning disabilities, the information applies to all types of tutoring.

Wellesley University Tutor Training Manual

www.wellesley.edu/sites/default/files/assets/departments/pltc/files/tutors/PLTC%20Tutor%20Training%20Manual%2010-11.pdf

This manual documents the types of logistics and content necessary to run a tutoring program (although it perhaps contains more than what an English tutoring program would need). Beginning on page 19, it discusses ways to make tutoring sessions successful, and beginning on page 55, it presents time-management skills.Tamanawis Peer Tutor Training Manual

tamanawistutors.wordpress.com/documents/peer-tutor-training-manual

This is a slightly shorter manual that contains information on effective tutoring sessions, learning styles, and good listening strategies, among other things. Again, not all the information will be relevant to an English tutoring program, but the manual itself can serve as a model.

Anoka-Ramsey Community College Tutor Training

https://www2.anokaramsey.edu/tutor_training/

This site contains ten interactive tutor-training modules, including “Introduction to Tutoring,” “Five Steps to Being Effective,” “Techniques That Work,” “Listening Skills,” and “Learning Styles.” Depending on the English level of the tutors, they could be directed to this site for specific self-study modules.

AmeriCorps’s Students Teaching Students: A Handbook for Cross-age Tutoring

This is a handbook for setting up a cross-age tutoring program. It is not intended to be given to tutors; rather, the information should be adapted for training tutors. It is particularly useful for younger tutors.

Author: Deirdre Derrick Format: Text
Availability

International Subscriptions: English Teaching Forum is distributed through U.S. Embassies. If you would like to subscribe to the print version of English Teaching Forum, please contact the Public Affairs or Cultural Affairs section of the U.S. Embassy in your country.

U.S. Subscriptions: English Teaching Forum is exempted from the Congressional restriction on distribution of Department of State-produced materials in the United States. U.S. residents who want to order the printed edition can order from the U.S. Superintendent of Documents.

Youth in middle and secondary grades, between childhood and the adult world, sometimes struggle with their identities as readers and learners. Too many describe themselves or are described by their teachers and parents as “reluctant, disengaged, and/or unmotivated” by classroom texts or by the rows of books in school libraries.

Even though blockbuster series have powered young adult fiction and cinematic markets over the last two decades (e.g., Harry Potter The Hunger Games Diary of a Wimpy Kid), “I don’t like to read” is nevertheless a common refrain in schools and in homes. The self-construction of adolescent youth, especially boys, as “bad” or “reluctant” readers is alarming at a number of levels—first, for those young people who have framed themselves in that way; and, second, for the societies they will enter and ultimately sustain. As such, creating a “culture of reading” across schooling contexts has been the subject of scholarship and international forums specifically dedicated to research and practice for literacy (Christenbury, Bomer, and Smagorinsky 2009; Power, Wilhelm, and Chandler 1997; Wilhelm 2008).

In terms of teaching English as a foreign language (EFL), the communicative language teaching paradigms that have long dominated the field tend to downplay literacy as a focus in preference for conceptualizing language as distinct if overlapping skill sets of reading, writing, and listening. Whether a student did or did not like reading has historically been of less concern to a field more focused on communicative language development. Yet, with more contemporary proponents of “literacy” arguing the multidimensional, multimodal, and existential ways of reading the “word/world” as an alternative (Freire 2000; Heath 1983; Paris 2011), the concept of literacy has slowly begun entering the professional lexicon of TESOL (Teachers of English to Speakers of Other Languages) International Association and other leading English language teaching  professional organizations; in addition, the “power of reading” is an emerging centerpiece of primary and secondary curricular paradigms (see Fay and Whaley 2004; Krashen 1993).

In this article, we argue that how adolescent language learners position themselves as readers does matter to teachers of EFL and that teachers do not have to accept a student’s declaration of “I don’t like to read” as a permanent reality. Schools, and English language classrooms in particular, can promote a culture of reading that forwards a communicative paradigm and at the same time embraces literacy as a “system for representing the world to ourselves—a psychological phenomenon; at the same time it is a system for representing the world to others—a social phenomenon” (Barton 1994, 33).

Specifically, we outline in practical ways the potential of applied theatre for stimulating purposeful, creative literacy engagement with adolescent learners in order to engage communication in multiple modalities and in interactive ways. We begin with a brief overview of applied theatre and contemporary theorizations of its relationship to literacy development. We continue with a description of four approaches for activating applied theatre for literacy development, using Shel Silverstein’s (1964)The Giving Tree as an anchor example. We conclude with special attention to how applied theatre might be leveraged across grade levels in diverse classroom settings and adapted for varied genres and forms of text. Our intent is directed to practitioners with the message that bringing theatre into the language classroom can be more than a warm-up activity or an end-of-unit celebration for parents and siblings. Rather, applied theatre can engineer far deeper literacies that ultimately reposition reading as transacting with the wor(l)d.

Four moves for deepening literacy production

While the strategies we describe can be used with any number of texts, as a common thread we use The Giving Tree to illustrate the theatrical “moves” we advocate. Just as other literacy strategies can be adapted to suit context and content, these applications of theatre can be used with a wide range of texts for a multitude of purposes, in series or in isolation. The short narrative of The Giving Tree tells of the relationship between a boy and a tree. Initially, the boy embraces the tree as a playmate—climbing under its wide branches. However, as he grows into a young man, he begins asking the tree for pieces of itself—its apples, branches, and finally its trunk—until the tree is nothing more than a stump for an old man to rest on. All the while, the Giving Tree is “happy” if the boy-man is happy—regardless of the sacrifices she makes to satiate his needs.

Traditionally, reading a story such as The Giving Tree would be broken down into a series of print-based pre-reading, while-reading, and post-reading activities that might include vocabulary review or vocabulary building exercises as a way of activating readers’ language schema in advance of the text; formative comprehension checks perhaps in the form of mapping out the narrative’s beginning, middle, and end; and, finally, some sort of summative comprehension check—often in the form of short written answers on paper.

As we will illustrate, applied theatre reframes reading as a creative transaction with meaning. These strategies can take verbal and non-verbal forms. They can be used in isolation or in combination. As such, readers are not looking for a fixed meaning within a text that they individually demonstrate their understanding of through a series of correct answers. Instead, literacy through an applied theatre lens frames reading as a recursive, collaborative, and generative transaction with meaning.

Like applied math and applied linguistics, applied theatre is eminently practical—with a primary focus not on distanced theories but on the immediacy of performance. Applied theatre can and should happen outside of traditional theatre spaces—whether that space is a school classroom, a library, a women’s clinic, an outdoor farmers’ market, a street corner—or just about anywhere. Breaking from traditional conceptualizations and enactments of performance, applied theatre values the dynamic, creative processes of embodied literacy embedded in day-to-day human activity and relations, with a focus on the process of creating. Whether it ends in a performance or not, applied theatre is in and of itself a generative act.

Because applied theatre has roots in the realms of both theatre education and popular theatre, many point out that though the term “applied theatre” is contemporary, its origins are ancient (see Prendergast and Saxton 2009). Indeed, communities and individuals have for millennia leveraged public performance to explore, express, and give meaning to individual and community experiences. Whether we are referring to Theatre of the Oppressed (Boal 1979), Brecht’s Learning Plays of the 1920s and 30s (Hughes 2011), or the rituals of ancient Greece and Africa, theatre has included practitioners dedicated to participant-centered forms in a range of contexts, sometimes including classrooms.

Research supporting and describing the links between applied theatre and literacy learning rests on this history and relies heavily on a growing base of case studies and practitioner-driven inquiry that help those inside and outside the field imagine the nuances of the communication context fostered by the union of drama and literacy. Theatre strategies mediate a space for generative, social meaning-making and response to literature (Schneider, Crumpler, and Rodgers 2006), scaffolding talk (Dwyer 2004), driving collaborative inquiry and problem solving across subject areas (Bowell and Heap 2001; Swartz and Nyman 2010), and shaping and informing writing (Grainger 2004). This context, reliant on the chemistry between leader and participants in equal part, is particularly effective for inspiring literacy growth among groups traditionally labeled “reluctant” or typically underserved by their system of education, including English language learners (Kao and O’Neill 1998).

Adolescent students in particular welcome the interplay of immediacy and distance in theatre as a way to negotiate complex identities between real and imagined worlds (Gallagher 2007). As students embody the theatrical space, they come to own the communication and shared context it fosters as well. In some settings, the theatrical mode echoes and honors familiar local cultural forms (Kendrick et al. 2006), creating an opportunity for deepening relevance.

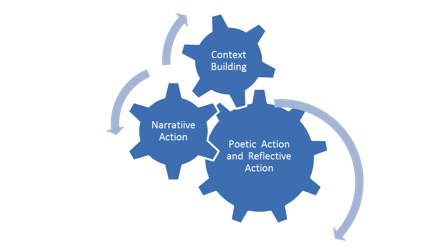
The four moves we describe (context building, narrative action, poetic action, reflective action) have much in common with the pre/while/after-reading sequence in that the moves are purposefully helping readers engage with the text at hand in scaffolded ways (see Figure 1, adapted from Neelands and Goode 2000).


Figure 1. Four “moves” for engineering deep literacy

There can be elements of story (beginning, middle, and end) inherent in an applied theatre approach to exploring a narrative, but when the approach is framed as a literacy process, the focus is on providing readers with multiple opportunities for meaning-making and symbolic representation of experience. In the sections that follow, we illustrate how the concept of applied theatre can become action. Blending ideas from the landmark drama/theatre compendium of strategies compiled by Neelands and Goode (2000)with contemporary arguments for textual enactments in middle grades and secondary-level literacy instruction (Wilhelm 2004, 2008), and incorporating our own shared experiences as theatre/literacy educators, we outline the concepts of context building, narrative action, poetic action, and reflective action as possibilities for the EFL classroom. Our intent is to create a direction for teachers interested in exploring the potential of process-oriented enactment strategies in fostering spaces for deep literacy engagement for reluctant adolescent readers.

Context building: Co-creating wor(l)ds

Applied theatre engages everyday people as “spect-actors,” where the line between actor and spectator/audience is purposely blurred. This approach fosters perspective taking that disrupts traditional power structures and interaction patterns such as teacher/student or performer/audience through embodied analytic communication (Boal 1979; Kao and O’Neill 1998). While some forms of applied theatre rely upon a degree of theatre expertise among facilitators or performers, the heart of applied theatre is of and for the common person. Applied theatre is home to trained artists and to regular folks with a continuum of approaches, contexts, and participants. Indeed, a tenet of applied theatre is its inclusion of and its connection to community, place, and participants. O’Neill (1995), a noted process drama scholar, points out that sometimes a strong theatrical sense helps applied theatre practitioners, and sometimes it is a hindrance. When the goal of the work is as much (or more) about inspiring, challenging, and framing the perspectives of participants as it is about performing art, seasoned theatre artists can struggle to let go of habits of traditional theatre performance that short-circuit responses to in-the-moment developments reliant on strong listening and observation. This is welcome news for novices, such as EFL classroom teachers, applying theatre in their context. No experience is required to begin.

Traditional plays center on the sequential performance of a scripted work; applied theatre centers on collective meaning-making and may or may not culminate in a final, polished performance in the traditional sense. Rather, creative explorations frequently progress more episodically than chronologically, with a heavy emphasis on participants inhabiting (and being challenged within) a range of perspectives, instead of enlivening a single character. Thus, an individual or group might simultaneously be asked to take on the perspectives of multiple characters—or even peripheral imagined characters to the story. In the case of The Giving Tree, spect-actors might be asked to take on the role of the tree or the boy or the tree’s imagined best friend—a little squirrel—or the boy’s cousin.

Sound-tracking texts

In process-based theatre, context-building conventions prepare participants for interaction with a specific text or idea as well as uncover or construct background and backstory. Theatre practitioners recognize that readers bring to texts “funds of knowledge” (Moll et al. 1992)or “schema” for transacting in dynamic ways with language, culture, and literacy. Sound-tracking is one such strategy. A collaboratively created soundscape helps participants build the world of The Giving Tree aurally as a way to activate prior knowledge and imagination. Before sharing the book with students, the teacher has them brainstorm a list of words to describe a child-friendly forest where trees care for people and people care for trees. What are the sounds of this forest? What are the primary sounds? The subtle sounds? Are there words? Are there voices? Have students suggest options and try them out, slowly building a one-minute soundscape using the class as the sound chorus, pausing for feedback and revision from the whole group, then circling back to incorporate ideas. We encourage teacher-facilitators to limit sound-making options to student voices and sound-making movements (e.g., whistling like a bird or gently tapping on a wooden desk in a way that might evoke rainfall) to foster innovation and focus problem solving.

Freeze-framing the written word

Having students use only their bodies and each other to create images in response to challenges creates opportunities for collaboration and communication physically, verbally, and non-verbally. To get at comprehension, we have leveraged something we like to think of as “freeze-frame reading”—an activity that blends kinesthetic and visual intelligences by challenging participants to use their own bodies to create a frozen image of a textual moment or key concept. The activity typically begins with a shared reading of a short text or passage (fiction or non-fiction), followed by an identification and discussion of a key moment in the narrative or an important concept. The Giving Tree provides readers with multiple opportunities for freeze-frames. Freeze-frames allow participants to identify and embody a specific narrative moment of the relationship between the boy and the tree or a complex concept such as “generosity.” Still images can also be used to help participants flesh out and share inferences about a setting, a relationship, a history, or a lifespan.

Students, in groups of three or more, might also create with their bodies a single frozen frame to illustrate a key contextual moment or concept. Allow groups time to brainstorm and rehearse. Share with the group at large. While each group is frozen, prompt the onlookers for analysis with questions like these:

  • “What do you see?”
  • “What relationships are here?”
  • “If you had to give this image a title, what would it be?”
  • “What might this person be thinking or saying?”

Stress to participants that the freeze-frame is frozen. Only the observers can talk. After each group’s “performance,” give the frozen group a brief opportunity to explain their intentions, qualifying that this is different from charades because there is no specific correct answer. In the prompt, students can be charged to create specific kinds of still images as it suits the larger drama, such as surveillance camera stills, photos from an album, or an advertisement.

Narrative action: Moving the story forward

Narrative conventions help participants build the emerging drama’s plot. This is not the same as dramatizing an existing story; rather, it involves enacting some elements, but also extending and elaborating ideas only hinted at in the text, implied in the illustrations, or imagined by participants. Narrative strategies are recursive and fluid but always build meaning.

Expert meetings about content and issues

Endowing the participants with expertise (power, high status) and the leader with a problem requiring assistance (need, low status) turns the hierarchy of the classroom on its head and prompts participants to speak and think and share and listen (Heathcote and Bolton 1995). Let’s say that the adolescents reading The Giving Tree are part of an imagined community conservation alliance—they are responsible for taking care of the trees but even more for protecting the environment for future generations. The teacher, in role as a new assistant to a local government official, initiates a conversation soliciting ideas, framing the children as experts—an arborist, a scientist, a farmer, a park ranger—and asking them to formulate their expert opinions about why trees are disappearing or abused and what possible actions should be taken.

Initiating an “expert meeting,” the teacher, out of role, explains that (1) there will be a meeting, and the students will be playing roles of people concerned with trees; (2) the teacher will take on a role, too; and (3) everyone must work together to improvise possibilities.

Some groups benefit from brainstorming a list of possible expert roles, but we caution against assigning everyone a role. Let them choose as the meeting evolves. Some will make strong character choices, others remain closer to themselves, and still others simply observe. All are valid ways to participate. The meeting itself need not be longer than a few minutes. Some teachers opt to wear a small costume piece to differentiate between themselves when they are in and out of role. It is helpful to think about the teacher as fostering possibilities rather than answering questions: opening up, not closing down. The meeting can close with the promise of future contact. This is a beginning, not an end.

Interview pairs about main and peripheral ideas

After students form pairs, one student interviews the other. One person in the pair is from the committee or is a reporter, and the other a community member who knows something about the situation. To support those students tentative about language, decide on a few stock questions (“What is your name?”; “How or what do you know about [global warming]?”), and then generate a common list of possible interview subjects and share possible questions for specific interviewees.

For The Giving Tree, interview subjects might include the park ranger, an elderly woman who lives at the edge of the woods, a political activist, or a talking rock. The pair engages in a brief, scaffolded interview, perhaps two minutes long, in which one partner questions and the other answers to build background information. All pairs are interviewing in parallel. There is no audience. After the interviews, the interviewer reports his or her most interesting finding to the class. An emerging student might simply read aloud a written response to the interview questions that his or her classmate has recorded on paper. An advanced student may speak as if reporting on the television news.

Hotseating characters and readers

Hotseating is essentially a group interview (interrogation) of one person. Hotseating and interview pairs are the same at their heart, with different stakes. The public nature of being interrogated on the hotseat by a crowd differs qualitatively from chatting one-on-one with a reporter in a quick interview. The context can be framed as a hearing or a media interview. If The Giving Tree drama work continually points to a person who has a significant hand in or a significant insight into the deforestation issue, he or she might be a worthwhile hotseat candidate: perhaps the boy or perhaps the Giving Tree will be recommended. Challenging the group to hotseat a role not fleshed out in the text creates a degree of creative freedom and challenge. Generating strong hotseat questions both as a group and individually prior to assigning the hotseated role improves the quality of questions and prepares those to be interrogated.

He said/She said

One example of a scaffolded hotseat is something we call “He said/She said.” This narrative strategy asks participants to assume the role of a character in a text—or an implied character—and to explain his or her point of view and subsequent rationale for his or her actions. With The Giving Tree, participants might, for example, assume the role of the tree or the boy—or an imagined character, such as the boy’s grandparents or a squirrel—and be called before what might be termed the “Forest Council.”

Again, students form small groups, this time prepping a participant to play a role with talking points for a brief “opening statement” explaining the rationale for or—depending on the role—their perception of a character’s actions. For example, the boy’s opening statement might narrate a childhood tragedy that left him completely dependent on the tree. The tree’s opening statement might describe her ideas about generosity and how it was that she came to feel so responsible for the boy’s happiness. A peripheral character such as a squirrel might describe his or her feelings about seeing the tree destroy herself.

After the series of opening statements that might include a “counter narrative” of the boy-man justifying his actions or grounding his dependency on an imagined background story—for example, he was orphaned as an infant and his father and mother had entrusted his well-being to the tree—the characters engage in a question/response session (hotseat) with the class. You can opt to use the introductions to segue into hotseating for each role, or you can have the group vote on which two perspectives they want hotseated, based on the introductions.

Poetic action: Representing and symbolizing structures and concepts

Many theatre-based explorations with young people include narrative-action and context-building elements, stopping short of the deeper elements fostered by poetic action and reflective action. Poetic strategies challenge participants to work on the symbolic and abstract levels with “highly selective use of language and gesture” (Neelands and Goode 2000, 6). While language and gesture contract to become focused and spare, the context in terms of time and space frequently expands to foster broader, deeper inquiries and insights and complex perspectives. In other words, as readers engage in a text, representing and symbolizing push student spect-actors to ask themselves what the text means for their lives—its potential implications and applications for who they are and who they are becoming. Thus, “poetic moves” encourage readers to think about decoding text as a creative act—not merely figuring out what the text means at the word, sentence, or discourse level, but what it could also mean symbolically for their specific contexts.

Forum theatre: Public re-vision

Forum theatre, a convention originating from Boal (1979), functions just as it sounds. A small group of spect-actors depicts a carefully selected challenging scene or situation while the remaining spect-actors look on. However, the wall between actors and observers is permeable, and actor or observer can stop the action at any point to share any insight, ask a question, or even replace an actor with an observer. The scene is replayed, interrupted, problematized, and analyzed several times with the goal of possibility and exploration as an aim, not just performing a “good scene.”

To begin, choose two actors to be the boy and the Giving Tree in their old age. Have them play out the story as written. Discuss with the entire group how some readers consider that this is a story about sharing; other readers see it as about selfishness. Explain that the actors are going to replay the story and, at any point, you or they can call “freeze” to stop the action. Challenge the audience to find stopping places where a different course of action could be taken if different choices were made or different circumstances were in place. Perhaps share a limited example to demonstrate the logistics, but be careful not to simply replay a different story with a plot dictated by the leader. Be ready with questions like, “What other options does the tree have here?”; “What about the boy?”; “Would intervention by another character change the story?”; and “What other events could occur and impact the story?” The discussion among the forum at these stopping places is even more important than the acting out of the story. Remember, a member of the forum can share an idea for the current actors to enact, or a member of the forum can replace an actor, bringing a new dimension and voice to the evolving scene. Finally, reflect individually and collectively on these new choices and endings and their messages. This reflection might be done in the form of a sharing circle—with participants simply voicing their ideas—or on paper in small groups with a representative sharing the group’s combined short reflection.

Flashback/Flashforward: Narrative points of view

Purposely playing with time helps break students out of the narrative mindset. Asking them to construct scenes, stories, or still images across a broad spectrum of time does include a narrative element, but it also challenges participants to boil down and focus their art. Taking away the verbal element can heighten the art as well as scaffold communication across language borders.

For The Giving Tree, a poetic exercise might take the form of having the adolescents imagine it is now 50 years after the tree’s death. They have been commissioned to create a wordless, musical video tribute to honor the history of the forest where the Giving Tree lived. Select a piece of music that is one minute long and have the adolescents form groups of three to five and choreograph a wordless scene from the history of the forest to perform for the entire class and then craft into a whole. Or, if the group wants to enter physically first, the teacher might ask the class to make a forest using their bodies—and then to embody that same forest in some sort of danger of extinction or destruction.

Reflective action: Looking forward, backward, and inward with texts

Reflective conventions stop the action and ask participants to “stand aside . . . and take stock of meanings or issues that are emerging” (Neelands and Goode 2000, 75). Participants are prompted to reflect, look back, or take a stand. Traditionally, having participants reflect on their learning happens as a means of closure in a well-planned lesson. We argue that theatre-centered strategies for bringing individual and group closure add layers of reflection to discussion and naturally meld disparate perspectives into a multi-voiced unit or experience. Moreover, the reflective strategies we describe in this last move make individuals’ learning public and provide the teacher-facilitator with valuable summative feedback about what an adolescent or a group took away from embodying a text.

Tapping into readers’ reactions

Have students take a place in the room to collect their thoughts. Explain that the leader will circulate and tap each person on the shoulder. When tapped, each participant will speak a word, phrase, or sentence that describes a vivid insight, feeling, or observation they had about The Giving Tree during the various performance “processes.” That might sound something like “Greed”; “Generosity can be destructive”; or “I’ll think before I ask for something—what my asking or taking might do to the other person.” For large classes with a range of language abilities, a variation on “tapping in” might include having clusters of students first form groups to discuss and record their reflections on paper. The clusters might then collectively embody some aspect of the mythical forest they depicted in the earlier learning segments with the teacher-facilitator tapping in not on individuals but on groups—with one or two group representatives articulating some of the reflections that members of the cluster voiced in the group reflection session.

Spaces between characters’ motivations and rationales

After a session where the relationship between the boy and the Giving Tree is prominent, have two volunteers stand before the group, one representing the boy, the other representing the tree. Ask another volunteer to place the two in relationship to each other, with the distance between the two telling us something important about their relationship. Ask the volunteer who just placed the boy and the tree to explain or interpret the physical space between the two characters. This might sound something like, “The space between the boy and the tree is about how the boy only thinks about himself and never the tree. The tree wants them to be closer—but the boy is always leaving. That’s why the boy is far away from the tree.” Let the group comment and question. Repeat with others placing and explaining.

Corridors of readers’ responses

Have the students imagine they are the collective conscience (or the thoughts) of the future generation of the Giving Tree’s forest. Explain to students that they will create a “human conscience hallway” with students facing each other about a meter apart in parallel rows. Each thinks of one piece of advice, one nagging question, or one cautionary phrase he or she wants the future generation to have in mind. Have a student walk through the human conscience hallway slowly as each student repeatedly says his or her chosen phrase. If time permits, have each participant take a turn walking through the conscience hallway.

Branching beyond The Giving Tree

We used The Giving Tree as an anchor text to help practitioners imagine specific strategies in action with a familiar text. The danger of aligning these strategies with a specific text, of course, is that readers start to see the strategies tied only to one story. It is important to remember that these strategies can be adapted to a wide range of texts. Traditional folklore, written or oral, pairs well with applied theatre strategies. In many ways, The Giving Tree echoes a folkloric style with its simple plot, elements of repetition, two-dimensional characters, and clear intended moral. The features entice participants to fill in, flesh out, and question the simple text. The story becomes the springboard for complexity through theatre. Adolescents find comfort in the familiar tales of childhood and freedom in twisting them into a new direction. Through soundscape, the context of a forest or a jungle or a kingdom or a market square can be enlivened in any classroom. Similarly, hotseating a character who has made errors, committed crimes, or acted selfishly positions spect-actors to flesh out two-dimensional characters with nuanced, justified motivations; the same is true of forum theatre. Further, finding traditional stories that are part of a community’s culture creates opportunities to purposefully connect with local lore and resources. If there is no written text of the story available, then collecting, listening to, retelling, illustrating, and sharing local stories adds another culturally relevant layer to your literacy environment. Just be mindful to choose stories without strong religious or spiritual parameters to “play” with—there are always many.

The anchor text you work from could be any genre, from fiction to non-fiction to poetry—even an illustration or photograph. You can use all or a portion of the text. You can use theatre strategies before, during, or after the full reading or examination of the text. However, some texts lend themselves more to the generative nature of applied theatre than others. Here are some questions to ask yourself as you filter texts for applied theatre possibilities:

  • What are some multiple perspectives (written or implied) this text affords?
  • What are the relationships and tensions that invite unpacking or extending?
  • Are there “unseen scenes” or peripheral incidents worthy of exploration?
  • Whose are the marginal voices that could be heard through dramatic activity?
  • What are the hard-to-answer ethical questions this text evokes?
  • What are the assumptions and easy answers that theatre could productively muddy?

The important step is to begin with a text that captures your interest and take a few small risks, then reflect and refine for the next episode. You will have many ideas, but the student work will suggest ideas and directions you had not imagined. Allow yourself time between installments to take in student ideas, mull them over, and build on them. As you grow in comfort applying theatre, you will be more able to do this on your feet. Your students’ positive response and their newfound voices brought forth in these authentically situated contexts will inspire your planning as well.

Conclusion: Performing literacy in classroom contexts

In making reading about more than decoding words on a page, EFL teachers and teachers of drama and theatre find common ground to push back against students framing themselves as reluctant or bad readers. Using applied theatre strategies helps teachers across disciplines stretch the multimodal and cultural borders of literacy to embrace multiple pathways to and through meaning-making that include traditional reading, writing, and listening facets within a broadened view of classroom communication covering an embodied semiotic system.

In other words, applied theatre creates opportunities for expressive and receptive communication in audio, gestural, spatial, linguistic, and visual modes working together in a complementary way (Cope and Kalantzis 2000). This effort makes space for diverse students to find entry points into the material. It also values adolescents in the co-construction process. Remember that teachers can start small, using a single strategy, or opt to string several strategies together in a single session or across a unit of instruction. Though the goal of this work is not performance, many teachers find that the material and excitement generated by students in a literacy-cum-applied theatre setting can be shaped into a sharing/performance event celebrating literacy and the meaning-making transaction that reading can be.


References

Barton, D. 1994. Literacy: An introduction to the ecology of written language. Oxford, UK: Blackwell.

Boal, A. 1979. Theatre of the oppressed. New York: Urizen Books.

Bowell, P., and B. S. Heap. 2001. Planning process drama. London: David Fulton.

Christenbury, L., R. Bomer, and P. Smagorinsky, eds. 2009. Handbook of adolescent literacy research. New York: Guilford.

Cope, B., and M. Kalantzis, eds. 2000. Multiliteracies: Literacy learning and the design of social futures. London: Routledge.

Dwyer, P. 2004. Making bodies talk in forum theatre. Research in Drama Education 9 (2): 199–210.

Fay, K., and S. Whaley. 2004. Becoming one community: Reading and writing with English language learners. Portland, ME: Stenhouse.

Freire, P. 2000. Pedagogy of the oppressed. 30th anniversary ed. London: Bloomsbury Academic. (Orig. pub. 1970.)

Gallagher, K. 2007. The theater of urban: Youth and schooling in dangerous times. Toronto: University of Toronto Press.

Grainger, T. 2004. Drama and writing: Enlivening their prose. In Literacy through creativity, ed. P. Goodwin, 91–104. London: David Fulton.

Heath, S. B. 1983. Ways with words: Language, life, and work in communities and classrooms. Cambridge: Cambridge University Press.

Heathcote, D., and G. Bolton. 1995. Drama for learning: Dorothy Heathcote’s mantle of the expert approach. Portsmouth, NH: Heinemann.

Hughes, E. 2011. Brecht’s lehrstücke and drama education. In Key concepts in theatre/drama education, ed. S. Schonmann, 197–201. Boston: Sense.

Kao, S. M., and C. O'Neill. 1998. Words into worlds: Learning a second language through process drama. Stamford, CT: Ablex.

Kendrick, M., S. Jones, H. Mutonyi, and B. Norton. 2006. Multimodality and English education in Ugandan schools. English Studies in Africa 49 (1): 95–114.

Krashen, S. D. 1993. The power of reading: Insights from the research. Englewood, CO: Libraries Unlimited.

Moll, L. C., C. Amanti, D. Neff, and N. Gonzalez. 1992. Funds of knowledge for teaching: Using a qualitative approach to connect homes and classrooms. Theory Into Practice 31 (2): 132–141.

Neelands, J., and T. Goode. 2000. Structuring drama work: A handbook of available forms in theatre and drama. 2nd ed. Cambridge: Cambridge University Press.

O’Neill, C. 1995. Drama worlds: A framework for process drama. Portsmouth, NH: Heinemann.

Paris, D. 2011. Language across difference: Ethnicity, communication, and youth identities in changing urban schools. Cambridge: Cambridge University Press.

Power, B. M., J. D. Wilhelm, and K. Chandler, eds. 1997. Reading Stephen King: Issues of censorship, student choice, and popular literature. Urbana, IL: National Council of Teachers of English.

Prendergast, M., and J. Saxton, eds. 2009. Applied theatre: International case studies and challenges for practice. Bristol, UK: Intellect.

Schneider, J. J., T. P. Crumpler, and T. Rodgers. 2006. Process drama and multiple literacies: Addressing social, cultural, and ethical issues. Portsmouth, NH: Heinemann.

Silverstein, S. 1964. The giving tree. New York: Harper and Row.

Swartz, L., and D. Nyman. 2010. Drama schemes, themes and dreams: How to plan, structure, and assess classroom events that engage young adolescent learners. Markham, Ontario: Pembroke.

Wilhelm, J. D. 2004. Reading is seeing: Learning to visualize scenes, characters, ideas, and text worlds to improve comprehension and reflective reading. New York: Scholastic.

—––. 2008. “You gotta BE the book: Teaching engaged and reflective reading with adolescents. 2nd ed. New York: Teachers College Press.


BIODATA:

Beth Murray, PhD, is Assistant Professor of and coordinates the program in Theatre Education at the University of North Carolina at Charlotte. Years as a public-school theatre teacher, a teaching artist, a program development facilitator, and a playwright/author for young audiences undergird her current research and creative activity.

Spencer Salas, PhD, is Associate Professor in the Department of Middle, Secondary, and K–12 Education at the University of North Carolina at Charlotte.

Michele Ni Thoghdha is the Chief Supervisor for English with the Ministry of Education, Oman. Prior to her current position, she has worked as a teacher, teacher trainer, supervisor, and department head in various countries. Her areas of specialization are young learners, development drama, and literacy.

Authors: Beth Murray, Spencer Salas, Michele Ni Thoghdha Format: Text
Availability

International Subscriptions: English Teaching Forum is distributed through U.S. Embassies. If you would like to subscribe to the print version of English Teaching Forum, please contact the Public Affairs or Cultural Affairs section of the U.S. Embassy in your country.

U.S. Subscriptions: English Teaching Forum is exempted from the Congressional restriction on distribution of Department of State-produced materials in the United States. U.S. residents who want to order the printed edition can order from the U.S. Superintendent of Documents.

This week’s information gap is designed for groups of three students.  Each student in the group has a unique set of information related to people’s schedules; students cannot show each other their clues.  The group members must discuss the information orally and record the details on a graphic organizer in order to reach a shared solution about how three people spent their weekends.  You can adapt this activity for groups or two or four students by modifying the number of clue sets you supply. 

Graphic organizers associated with this type of information gap activity can be formatted as charts or grids.  This activity uses a chart.  In the Variations section, two other activity examples demonstrate how to use grids to capture information that is orally shared among group mates or partners.

Level

Lower intermediate and above

Language focus

Speaking/listening functions:  sharing and recording details
Vocabulary:  weekend/free-time activities, schedules
Grammar:  prepositions in time phrases (in the morning, at 5:00pm, on Saturday)

Goals

During this activity, students will:

  • Orally share clues about three people’s schedules and use a chart to record each person’s complete weekend schedule
  • Review and practice the use of prepositions in time phrases

Materials

  • Teacher:
    • Whiteboard, chalkboard, or large pieces of paper posted on the wall
    • Markers or chalk
    • Answer Key – Schedules (.pdf)
    • Scissors
    • Digital or overhead projector (optional)
  • Students:
    • Pencils and erasers
    • Blank paper 
    • Set of clues, cut up into three parts:  Person A, B, and C (.pdf)

Preparation

  • Print out/copy and cut up sets of clues, enough copies so that each group of three has a set
  • Prepare to display the script text seen in Step 3 on the board.  Use a projector, if available, or write the text on the board in advance and cover it with a large piece of paper.

Procedures

  1. Draw a chart on the board with four boxes, like this:
  2. Saturday

    Morning (before 12:00 pm) -

    Afternoon (between 12:00 pm and 6:00 pm) -

    Evening (after 6:00 pm) -


  3. Tell students you are going to describe part of your weekend. Ask them to listen for information about what you did at different times during the day (morning, afternoon, and evening).
  4. Read the following script twice. “I did a lot of things on Saturday. First, I woke up at 8:00.  I ate breakfast and went for a walk in the morning.  Next, I ate lunch at 1:30 with my friends at Charlie’s Restaurant.  Then, in the evening, I went shopping for new clothes.  I went to a concert at 9:00.  Then I came home and went to bed.  What a busy day!”  (Note: You can also create a short personalized description of your weekend activities; if you create your own script, be sure to include a mix of on, in, and at time phrases.)
  5. Ask student volunteers to supply the missing information and fill out the chart on the board.  Read the script again to help students complete the chart if needed:

  6. Saturday

    Morning (before 12:00 pm) - woke up, ate breakfast, went for a walk

    Afternoon (between 12:00 pm and 6:00 pm) - ate lunch at Charlie’s restaurant

    Evening (after 6:00 pm) - went shopping, went to a concert, came home, went to bed


  7. To review prepositions and time phrases, display the script text on the board.  Underline prepositions in the time phrases and ask students about how each is used (example: “Which preposition do we use with days of the week/dates?  With specific times like 1:00pm?  With times of day like evening?”): “I did a lot of things on Saturday. First, I woke up at 8:00.  I ate breakfast and went for a walk in the morning.  Next, I ate lunch at 1:30 with my friends at Charlie’s Restaurant.  Then, in the evening, I went shopping for new clothes.  I went to a concert at 9:00.  Then I came home and went to bed.  What a busy day!”
  8. Put students in groups of three; ask them to count off “A, B, C” in each group.  Tell students they will work together to recreate the weekend schedules of three people:  Patty, Sam, and Karen (Note: You can substitute local names, if desired).  Person A is in charge of finding out about Patty’s schedule, Person B will ask about and record details about Sam’s schedule, and Person C will find out Karen’s schedule.
  9. Guide the students through the process of drawing a chart similar to the one you used in your example at the beginning of the activity.  Each person’s chart should have two columns, one for each day of the weekend.  For example, Person A’s chart would look like this (Note: re-label the weekend days in accordance with your local observances, if needed):

  10.          Patty’s Weekend Schedule


    Saturday

    Sunday

    Morning (before 12:00 pm) -

    Morning (before 12:00 pm) -

    Afternoon (between 12:00 pm and 6:00 pm) -

    Afternoon (between 12:00 pm and 6:00 pm) -

    Evening (after 6:00 pm) -

    Evening (after 6:00 pm) -


  11. Ask student volunteers to pass out a set of clues to each group.  Ask students to each take one clue sheet, A, B, or C, from the set.  Tell students to put their clue sheets face down on their desks.
  12. Explain that each person will have a set of clues about Patty, Sam, and Karen’s schedules.  Students cannot show their information to their group mates; they must orally share the information and use their charts to record their assigned person’s schedule.
  13. Ask students to turn over their clue sheets.  Explain that before the group begins working together, each person must first complete the missing information on their clue sheet by adding in the appropriate prepositions for the time phrases.  Give students a few minutes to fill in the missing prepositions.     
  14. Explain that Person A should ask his/her group mates about Patty’s schedule and record the information on his/her chart.  Give or elicit examples of questions that Person A might ask: “Who knows what Patty did on Saturday morning?  What did Patty do in the afternoon?”  All group members should consult their clue sheets for information to help Person A complete Patty’s schedule.  While students share information, their group mates should listen carefully to the prepositions in the time phrases used and suggest corrections if needed.  For example, if Person B says “Patty played soccer on 2:00,” the other group mates should correct the preposition.
  15. Once Person A has finished asking questions and recording details about Patty’s schedule, Person B and Person C should repeat the process to collect information about Sam and Karen’s schedules.
  16. While students work, monitor their progress, make notes about any challenges students have with prepositions in time phrases, and offer support as needed.  Ensure students aren’t showing each other their clues sheets.
  17. Since groups will finish the activity at different rates, you can set up an “answer checking” station with a few copies of the answer key at the front of the room.  When a group finishes, they can come to the station together and check their answers.  You can man the station as students check their answers, or you can let them independently check their work.  If they missed any information, they can return to their seats to discuss the source of the problem(s).  Students who complete the task satisfactorily can move on to another pre-designated task (starting a homework assignment, reading silently, etc.) while the remaining groups work on the information gap.
  18. To close the activity, conduct a brief whole-class review to reinforce concepts from the activity and to address any common errors you observed while students worked in groups.     

Variations – Information Gaps with Grids

In this information gap activity, students used charts to record information needed to complete the task.  Other information gaps with oral clues use grids to capture details.  See the activities below for examples of “oral clue - grid” information gaps:

  • Try This: Listening and Logic (2015) by Heather Benucci:  In this information gap activity, students solve logic puzzles using a grid that helps them keep track of information in the puzzle’s clues, use the process of elimination, and make inferences that will lead them to the puzzle’s solution.
  • Tools for Activating Materials and Tasks in the English Language Classroom (2009 – see p. 6, “Grids Galore” Activity) by Rick Rosenberg:  In this activity, students use grids to track answers related to grammar and vocabulary questions.

Information Gap Tip of the Week –
Delayed Feedback and Error Treatment

Since information gaps are usually student-centered and fluency-focused activities, teachers take on the role of observer and facilitator.  In this facilitator role, teachers should generally avoid interrupting students during speaking activities to allow them to negotiate meaning with their peers.  To ensure accuracy is addressed at some point, however, teachers can make notes about the language errors they observe while monitoring student progress.  Use some example student errors to conduct a delayed feedback session, either directly after the fluency-focused activity or during a subsequent class period.  For example, you can list anonymous examples of actual student errors on the board or on a worksheet and ask students to spot and correct the problems.  You can also use your notes on student mistakes to identify error trends and define topics you want to cover during remedial instruction or in activities that recycle the problematic content.      

Format: Text
Availability

How are sheep and English related? Find out in the story about sheep that help keep people around the world warm.

Format: MP3, Text
Availability
This week’s activity is an information gap designed for pairs.  The activity involves giving directions, asking for clarification, practicing vocabulary, and drawing.   Students will draw their “dream home” and then describe the image to a partner who can’t see the picture.  The partners must listen to the description and ask follow-up questions as they try to reproduce a drawing of the other person’s dream home.  This activity can be considered an information gap because the student describing the image has the information the other student needs to successfully complete the task.
  

Level

Lower intermediate and above; see the Variations section for ideas that are appropriate for beginners and above

Language focus

Speaking functions:  giving instructions, asking for clarification, describing a picture or scene
Vocabulary:  exterior parts of a house and the surrounding area, shapes, sizes, colors
Grammar:  imperative statements, clarification questions, prepositions of location, comparative adjectives (e.g., “No, the front door is bigger than the one in your picture.”)

Goals

During this activity, students will:

  • Review and practice prepositions of location and vocabulary related to the exterior parts of a house and the surrounding outdoor areas as they describe a dream house to a partner
  • Ask for clarification about instructions they receive from their partner

Materials

  • Teacher:
    • Whiteboard, chalkboard, or large pieces of paper posted on the wall
    • Markers or chalk
  • Students:
    • Pencils and erasers, markers, crayons, or colored pencils
    • Blank paper 

Procedures

  1. Draw a big rectangle on the board to represent a sheet of paper.  Then use your “paper” to draw an exterior view of your dream home while you do a think aloud for the class:
    • Tell students this picture represents your dream home, the house you would live in if you could live anywhere and you could spend as much money as you wanted. 
    • Your dream home can have as many features as you want.  As you draw, name parts of the house or elicit the vocabulary items from the students (example: “I want lots of sunlight in my dream house…[draw four big windows]…hmm, can anyone tell me the vocabulary word for these [point at the windows]?”)
    • Consider adding some outside features to your house, such as a driveway, a swimming pool, a sun in the sky, or trees, bushes, and flowers.
    • Don’t worry:  you don’t have to be an amazing artist!  A simple line drawing is fine.
  2. Once your picture is done, elicit additional vocabulary items related to parts of a house and the outdoor areas near a house.  List these items on the board.
  3. Tell students they are each going to draw their own dream home and then describe it to a partner who won’t be able to see the picture.
  4. Depending on your students’ level, at this point, you may want to use your sample drawing to review language functions needed to complete the task, such as:
    • Locations on a piece of paper:  in the top center of the paper, on the bottom left side, in the corner, in the middle
    • Prepositions of location:  above, next to, to the left of
    • Giving directions with imperatives:  Draw a square.  Add a triangle on top for the roof.
    • Comparisons:  The front door needs to be smaller.     
    • Asking for clarification: Is this the right size/shape?  Like this?
  5. Tell students to draw their dream house on a blank sheet of paper.  If desired, depending on the amount of time you are allocating for the task, students can add color to their pictures.  Tell students that they can make their houses as simple or as fancy as they want, but they will need to be able to explain the house’s parts and where they are located to a partner.
  6. Circulate as students draw.  Answer questions about any house-related vocabulary while students work, or encourage them to use dictionaries to look up any unknown terms.
  7. Put students in pairs.  Tell them not to show their original pictures to their partners.  Have students sit so the describing student can shield his/her paper from the drawing student’s view.  Describing students should be able to see the drawing students’ work; describing students will provide clarifications and answer questions about the new drawing while their partner works.
  8. Tell the drawing students to draw what their partners describe in pencil.  They may need to make corrections as they receive/ask for clarification from their partner, so they should have an eraser.  After the describing partner thinks the new picture is fairly close to the original, he or she can give the drawing student information about adding color to the picture, if desired.
  9. Circulate as student pairs work together.  Remind students not to show each other their original pictures, if needed, and offer support as required.
  10. After each pair finishes, they should switch roles with the drawing student now describing his/her picture to the partner.
  11. Once both students have had a chance to draw, ask the pairs to compare the new drawings to the original pictures and describe the similarities and differences they see. 
  12. To close the activity, you can conduct a whole-class debrief to review any challenging vocabulary or language function items.  Ask a few pairs to share and describe their drawings.

Variations

Procedure Variations
For a faster version of the activity that doesn’t focus on asking for/giving clarification, have students sit back-to-back as they describe and draw.  The pictures will likely have many more differences with this approach, which can make students laugh as they compare the results!  The lack of similarity can provide a rich opportunity to practice comparative adjectives as students evaluate and describe how the pictures differ.

Content Variations
These procedures used a “dream house” theme, but teachers can adapt the activity to use other themes that suit their language and content objectives.  Here are few ideas for how to vary the focus of a picture dictation information gap.  Students will draw, describe, discuss, and recreate:

Drawing Content

Language Focus

Notes

Combinations of basic shapes (a red triangle next to a black circle with two different- sized colored squares inside, etc.)

Vocabulary: shape, colors, sizes, location words; prepositions of location (above, next to, on top of, inside)

Great for beginner-level students!  As an extension activity, students can switch partners after drawing, taking their pictures with them; then students can point to items and orally quiz their new partners about the vocabulary items they see, or the new partners can write 3-4 “There is… /There are…” sentences describing the drawing.

An imaginary alien, robot, or monster

Vocabulary: body parts, colors, sizes, appearance adjectives; prepositions of location

Encourages students to use their imagination as they draw and practice vocabulary items; students can develop a description of the alien/monster/robot and the things it can do/likes to do as part of a speaking or writing extension activity

An ideal vacation scene

Describing a scene (people, places, buildings, scenery)

Students get to personalize their scene; they can explain why this would be their favorite vacation spot or plan what they would pack for a vacation to this location as part of a speaking or writing extension activity

Their favorite location in their hometown

Describing a scene (people, places, buildings, scenery)

Students talk about a place that is personally meaningful while giving instructions and providing clarification; students can explain why this place is important to them in a speaking or writing extension activity

An animal in its habitat

Describing a scene (animals, plants, places); science vocabulary

A fun review activity for a science/biology lesson; animals can be assigned by the teacher or chosen by students – students must recall specific content details they learned about their animal when drawing the scene and giving instructions to their partner.  Students can use their dictation drawing to illustrate a short report they write about their animal after the activity.

Information Gap Tip of the Week – Extension Activities 

You don’t want information gap activities to be isolated items stuck in your lessons, right?  How can you connect these activities to other parts of your lesson?  Be sure to consider the importance of good sequencing and flow when planning your lessons by linking information gaps to previously taught content.  Information gaps can be a fun and motivating way to recycle and review this material. 

Also, look for ways to create logical extension activities that relate to the information gap activities.  Extension activities allow students opportunities to reengage with the language and content from a slightly different angle, perhaps in a way that requires more advanced or complex skills.  These follow-on extension activities may involve other language skills or interaction patterns (individual, group, or whole-class work) and can be assigned for in-class completion or homework.  See the Content Variation chart above for a few suggestions on how you can extend drawing dictation information gap activities. 

Format: Text
Availability

Meet Cuy. He has a goal and works toward the goal. Does he achieve it? Read and find out!

Format: MP3, Text
Availability

This activity describes how to adapt the Activate: Games for Learning American English board game called “Which One Would the World be Better Without? Why?” to create opportunities to use common irregular comparative and superlative adjective forms:  good -> better -> best and bad -> worse -> worst.

Level

Upper intermediate

Language focus

  • Grammar:  irregular comparative and superlative adjectives
  • Speaking:  comparing, contrasting and ranking; explaining an opinion

Goals

During this game variation, students will:

  • Use irregular comparative and superlative adjectives (good -> better -> best; bad -> worse -> worst) while comparing, evaluating, and ranking three items.
  • Use creative thinking, imagination, and personal preferences to create original oral responses during game play.
  • Have fun!

Materials

  • Teacher:
    • Whiteboard, chalkboard, or large pieces of paper posted on the wall
    • Markers or chalk
    • Clock or other timing device
    • Overhead or digital projector (optional)
  • Students:
    • “Which One Would the World be Better Without? Why?” board game (.pdf), enough to have one board game per group of 3-5 students.
    • Die or die alternatives (e.g., a pencil with numbers 1-6 written on each side, which can be “rolled” like a die); enough to have one die per group of 3-5 students.  Note: die is the singular form of dice – a good language point to cover with students!
    • Game pieces to represent each player’s position on the game board.  You can use coins, buttons, balls of colored paper or clay, colored paper clips, plastic figurines, or unique stones.

Preparation

  • Print out and copy the “Which One Would the World be Better Without? Why?” board game. You’ll need enough copies to have one board game per group of 3-5 students. 
  • If you’d prefer, you can have students create copies of the board game on sturdy paper or pieces of cardboard with your guidance.  For this option you will need to supply to board-making materials and markers or colored pencils.

Procedures

  1. Tell students they are going to play a board game that asks them to analyze three items and to rank the items according to how they affect society in positive or negative ways. 
  2. If desired, quickly review the irregular comparative and superlative adjective forms of “good” and “bad.”  Elicit the forms from students and ask a couple of volunteers to give example sentences using these forms. 
  3. Put students into groups of 3-5.  Ask student volunteers to pass out the board games, dice, and game markers to each group.
  4. Demonstrate the game play process: 
    • Draw or project a copy of the board game on the whiteboard, chalkboard, or wall.
    • Explain that the goal is to be the first player to move from the “Start” space to the “Finish” space.  Tell students they will do this by taking turns rolling a die, moving along the path, and responding to the prompts in the associated squares. 
    • If needed, show students how to roll the die and move a game piece according the number shown on the die. Tell students each player only gets to roll the die one time per turn.  Explain what happens when someone lands on a penalty square, such as “Bad luck! Go back 5 spaces!”
    • Explain that when students land on a prompt square, they must examine the three options and decide if they are going to give a “good for society” response or a “bad for society” response.  Students should announce their choice to the other players and then rank the items as bad, worse, and the worst for today’s society or good, better, and the best for today’s society. They should be ready to explain each ranking.  Use the examples below to demonstrate that most items in the prompts can be described in a positive or negative light with some creative thinking:
      • Prompt
        zoos, video games, prisons
      • Sample responses
        (bad, worse, and the worst) I think video games are bad for society because they keep kids from playing outside.  Zoos are worse than video games because zoo animals don’t have much space to move around.  I think prisons are the worst for society because they are expensive and don’t reduce crime.
        (good, better, and the best)  Prisons are good for society.  They punish criminals.  Zoos are better than prisons because zoos help us learn about endangered animals.  In this group of items, video games are the best for society because they teach us to solve problems and work together.
      • Explain that there is not one “correct” answer for each prompt; instead, the goal is to practice using English and be creative. 
  5. While students are playing, circulate around the room and answer any questions the groups have. 
  6. When the round of play is over, students can form new groups and play again, or you can move on to a whole-class feedback session:
    • Ask students to share some of the most interesting or creative responses they heard while playing.
    • Answer any student questions about the language heard during the game.
    • Ask all game winners to raise their hands or stand up and receive a round of applause.
Format: Text
Availability

Where are your former classmates today? When Mr. Lois discovers the new job of one of his former classmates, it changes him.

Format: MP3, Text
Availability
This activity asks students to analyze pictures of people from other cultures in different settings.  Students will work in groups to answer questions about the picture and then complete a short writing task based on their observations. 

Level

Lower Intermediate and above.

Language focus

  • Grammar:  comparative adjectives
  • Speaking/Writing:  describing a scene; comparing and contrasting details

Goals

During this activity, students will:
  • Analyze and discuss a picture of people from another culture (national, regional, etc.)
  • Write a paragraph containing at least three comparative adjectives describing some of the differences they observe between the picture and their local environment/culture

Materials

  • Teacher:
    • Whiteboard, chalkboard, or large pieces of paper posted on the wall
    • Markers or chalk
  • Students:
    • Pencils or pens
    • Blank writing paper
    • Photos of people who live in other places doing a variety of activities, enough so that each group of 3-4 students can have one photo. The two sample photos in this activity come from Celebrate! Holidays in the U.S.A.

Preparation

  • Collect a set of pictures showing people from other cultures.  You can use pictures from magazines, the internet, or other sources.  Write a short caption under each photograph.  Try to include diverse activities and locations in your photo collection (people in the city/country, people playing games, people celebrating holidays, people doing things during different seasons, etc.)  Be sure to collect enough pictures so that each group of 3-4 students will have one.

Sample Picture 1

photo of family
An American family enjoying Thanksgiving dinner. (Celebrate! Holidays in the U.S.A., p. 45)

Sample Picture 2

photo of family
An American family on a summertime picnic. (Celebrate! Holidays in the U.S.A., p. 81)

Procedures

  1. Show students 2-3 pictures from your collection.  Ask student volunteers to briefly describe what they see happening each picture.
  2. Put students into groups of 3-4.  Tell groups that they are going to compare what they see in the picture to what life is like where they live.  Ask one student from each group to choose a picture from the collection for their group.
  3. Ask groups to look carefully at their photo and to discuss the answers to the following questions, which should be written on the board.  Students should make notes during the discussion.  Be sure to model an example with the class before groups begin their discussions, and remind students to read the photo caption (short description) first when the discussion starts.
    • Where does the scene in the photo take place?
    • What time of year do you think it is in the photo?  What time of day is it?
    • What is the weather like in the picture? (if outside)
    • Describe the people in the picture. 
      • What do they look like?  What are they wearing?
      • What are they doing?   Why?
    • Describe other things, shapes, or symbols you see in the picture.            
  4. Next, ask groups to brainstorm as many differences as possible between what they the see in the picture and what they usually see or experience where they live. 
  5. Tell groups they must write 3 sentences that use comparative adjectives to describe some of the differences they found.  Review how to use comparative adjectives to make this type of sentence by giving a few examples:

  6. (Using Sample Picture 2)

    Difference seen in the picture              Warm weather  Friendly dog Food does not look good
    Sentence with a comparative adjective The weather in the picture looks warmer than weather where we live. The dog with the family looks friendlier than dogs in our neighborhood. The food in our country is more delicious than the picnic food in the picture.
  7. Finally, ask groups to use their notes from their initial conversation about the picture and their comparison sentences to create a complete paragraph that describes their picture.  The paragraph should contain about 7 sentences and use the following structure.  Write this paragraph framework on the board, and then show students an example paragraph.

  8. Paragraph Framework
    Sentence 1:  describe the picture in general 
    Sentences 2-3:  describe details in the picture (the people, the scene)
    Sentence 4:  There are some differences between what we see in the photograph and life in our area. 
    Sentences 5-7:  describe three differences (use the comparative adjective sentences)

      Example paragraph:
      Our picture shows an American family eating a picnic in the summer.  There are two parents, three children, and a dog at the picnic.  They are eating next to a big river and lots of mountains. There are some differences between what we see in the photograph and life in our area.  The weather in the picture looks warmer than weather where we live.  The dog with the family looks friendlier than dogs in our neighborhood.  Also, we think the food in our country is more delicious than the picnic food in the picture.

  9. While groups work on their paragraphs, circulate around the room and answer any questions they have. 
  10. When groups are finished, have them share their work in one of two ways:
    • Assign each group a partner group.  Ask the groups to show each other their pictures and read their paragraphs to each other.  
    • Ask groups to post their pictures and paragraphs around the room.  Give everyone 5-7 minutes to get up and review the other groups’ work.  When time is up, ask a few students to share which picture/paragraph packages they liked best and why.
  11. Ask groups to turn in their paragraphs before the end of class.  Provide individualized written feedback to each group, and review any common errors with comparative adjective use you observed with the whole class during the next class meeting. 
Format: Text
Availability

Pages